
Official version · Indicator
Supply and Demand Dashboard PRO MT4 V4.2
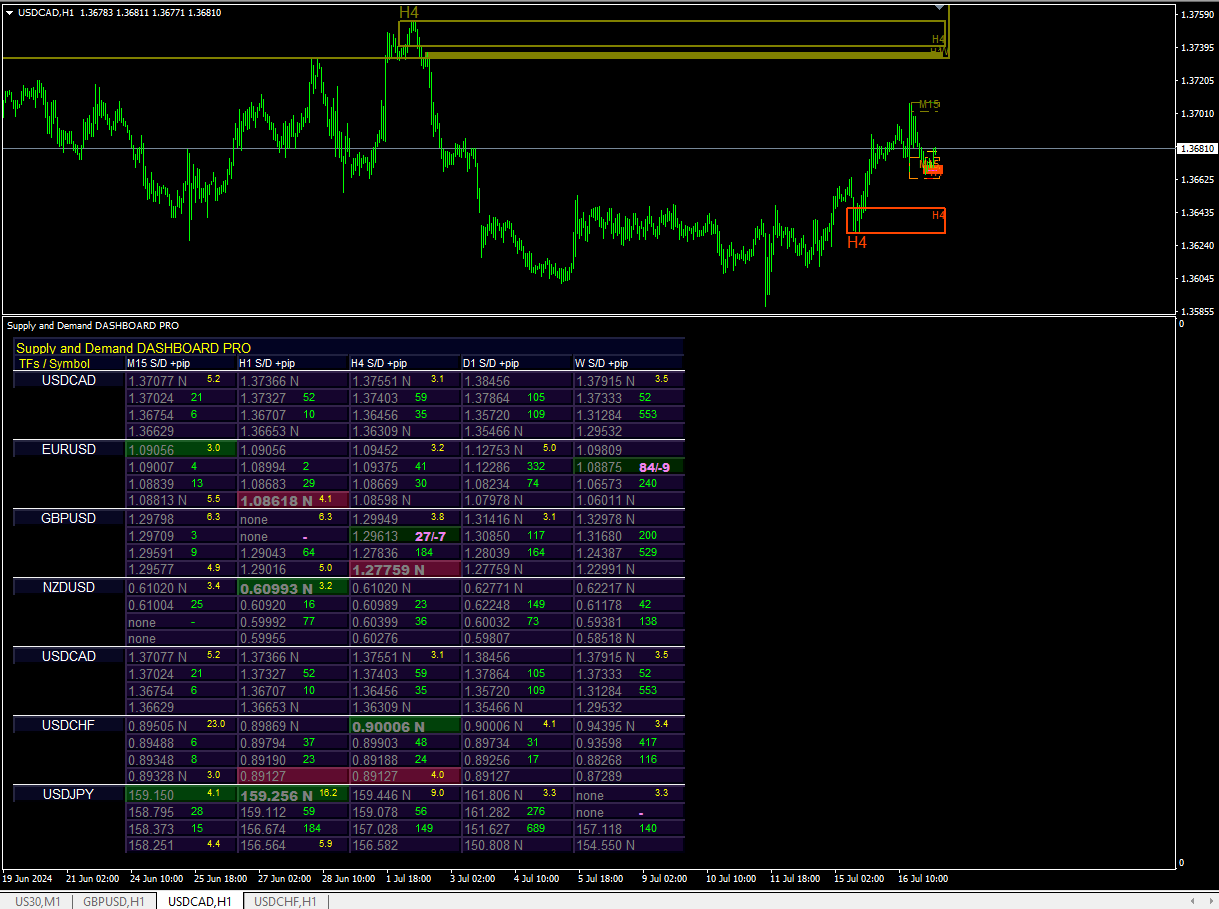
The Supply and Demand Dashboard PRO Indicator is a state-of-the-art trading tool that simplifies the complex task of identifying key market levels. It provides an at-a-glance overview of supply and demand values, including zone strength ratings and pip distances to and within zones.
The dashboard highlights nested zones and offers four types of alerts for chosen symbols across all nine timeframes. Highly configurable, this indicator can be tailored to meet your specific trading needs.
This Package Contains an Instant Download of:
+ Indicator: Supply and Demand Dashboard PRO (.ex4) V4.2
+ How to Install MT4 files.pdf
More Information:
+ https://www.mql5.com/en/market/product/37335
Live Performance Signal:
+ N/A
If you already own it, your files and license details are still in your account.
Official versionsInstant downloadFuture updates includedExtra 20% off with cryptoReal people on support28,000+ tradersTrading since 2019Rated Excellent on Trustpilot
Product description
About Supply and Demand Dashboard PRO MT4 V4.2
Supply and Demand Dashboard PRO Indicator for MT4 by Bernhard Schweigert
Introduction
Unlock the full potential of your trading strategy with the Supply and Demand Dashboard PRO Indicator for MT4 by Bernhard Schweigert. This sophisticated dashboard is a powerful tool designed to provide traders with a comprehensive overview of supply and demand zones across multiple symbols and up to nine timeframes. Whether you’re a novice trader or a seasoned professional, this indicator offers valuable insights and advanced features to enhance your trading decisions and maximize your profitability.
Detailed Description of the Product
The Supply and Demand Dashboard PRO Indicator is a state-of-the-art trading tool that simplifies the complex task of identifying key market levels. It provides an at-a-glance overview of supply and demand values, including zone strength ratings and pip distances to and within zones. The dashboard highlights nested zones and offers four types of alerts for chosen symbols across all nine timeframes. Highly configurable, this indicator can be tailored to meet your specific trading needs.
How the Strategy Works
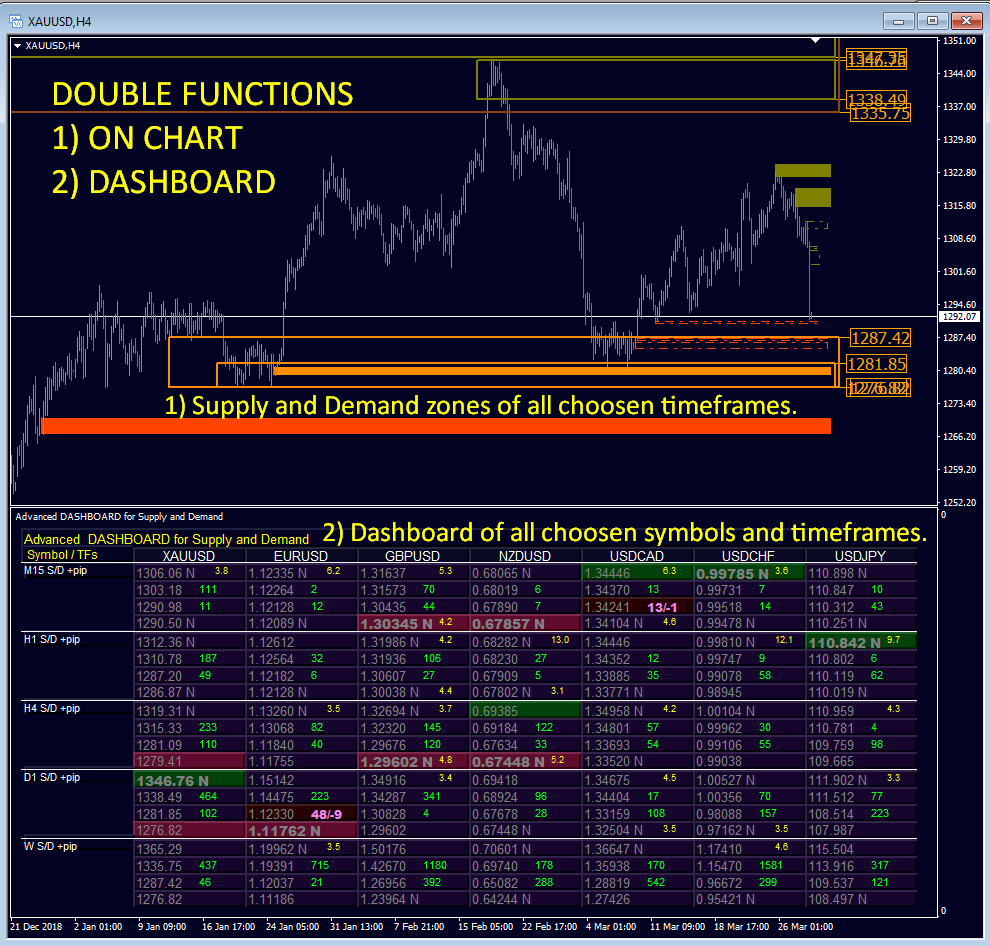
The dashboard is built around the concept of supply and demand zones, which are critical levels where price action is likely to occur. These zones are areas where the balance between buyers and sellers is significantly skewed, leading to strong price movements. The Supply and Demand Dashboard PRO helps you identify these zones and provides actionable insights into where to enter and exit trades.
Key Features:
- Filtered Supply and Demand Values: The dashboard displays supply and demand levels with strength ratings, helping you identify the most significant zones.
- Pip Distances: Easily see the distance to and within supply and demand zones, allowing for precise entry and exit points.
- Nested Zones: Highlighted zones that fall within higher timeframe zones, offering a higher probability of successful trades.
- Alerts: Receive alerts for new zones, price entering or leaving a zone, and zone breaks. You can filter these alerts for nested zones and select specific timeframes and symbols.
Benefits for Traders:
- Optimal Entry Levels: Enter trades within or near strong supply/demand zones to increase your chances of success and improve your risk/reward ratio.
- Effective Stop Loss Placement: Place stop-loss orders below/above strong supply/demand zones for maximum safety.
- Strategic Profit Targets: Use the next supply zone as a target for buy trades and the next demand zone for sell trades, ensuring effective exit strategies.
- Zone Filtering: Focus on zones with the greatest imbalance between buyers and sellers to capture significant price movements.
Trading Specifications: Recommended Pair, Timeframe, and Minimum Balance
Recommended Pair
The Supply and Demand Dashboard PRO Indicator is versatile and works with multiple symbols, providing a comprehensive market overview. It is especially effective with major forex pairs, indices, and commodities.
Timeframe
The indicator is designed to work across up to nine timeframes, with the M5 timeframe being particularly effective for short-term trading strategies. However, it can be customized to suit various trading styles and timeframes.
Minimum Balance
There is no specific minimum balance required to use the Supply and Demand Dashboard PRO Indicator. However, it is recommended to have a sufficiently funded account to manage trades effectively and utilize the insights provided by the indicator.
Our Thoughts About It
The Supply and Demand Dashboard PRO Indicator stands out as an indispensable tool for traders seeking to enhance their market analysis and trading performance. Its comprehensive display of supply and demand zones, coupled with advanced filtering and alert features, provides a significant edge in the market.
- Comprehensive Market Overview: The dashboard’s ability to display multiple symbols and timeframes offers a holistic view of the market, helping traders make informed decisions.
- User-Friendly Interface: Despite its advanced features, the indicator is highly configurable and easy to use, making it accessible to traders of all experience levels.
- Enhanced Trading Performance: By focusing on key supply and demand zones, traders can improve their entry and exit strategies, leading to better overall trading performance.
- Customizable Alerts: The ability to set specific alerts ensures that traders never miss important market movements, allowing for timely and strategic trades.
Reviews
MarcoEA (2023.06.09)
“Hello, I bought two of your indicators, Supply and Demand and the Dashboard of Supply and Demand. What are the bonuses?”
Gabor Bocsak (2023.05.23)
“I really like the indicators! Actually, I use four of them, and they work really well together! I had a lot of questions as I use a bit different strategy, but I got all the help! Thank you!”
Tyrena Booker (2023.02.01)
“The indicator is phenomenal!!! This indicator helps me know when pullbacks are happening. I enjoy the enhanced features of this indicator because you can add any symbols and see the whole market within seconds. I use this indicator with Currency Strength Exotics on the chart and let’s just say you will be counting pips. Bernhard will help with your questions and answer each one in a punctual time. I highly recommend this indicator to anyone. I appreciated your help, Bernhard!”
Conclusion
In conclusion, the Supply and Demand Dashboard PRO Indicator for MT4 by Bernhard Schweigert is a game-changing tool for traders looking to refine their market analysis and enhance their trading performance. Its advanced features, user-friendly interface, and comprehensive market insights make it an invaluable asset for any trader. Available on CheaperForex.com, this indicator provides an effective and reliable solution for mastering the markets with precision and confidence.
Experience the power of the Supply and Demand Dashboard PRO Indicator and take your trading to the next level. With this advanced tool, you can make informed decisions, optimize your trades, and achieve greater profitability in the dynamic world of forex trading.
Every order
What’s included with Supply
- Instant downloadReady after checkout and kept in your account
- Free future updatesIncluded when we receive them, every version kept in your account
- Unlimited activationsUnlimited live and demo accounts
- Setup helpReal people on Telegram or email
- 7-day money-back guaranteeIf the EA fails to attach to your chart because of errors we can replicate, you get a full refund.
*Refunds don’t cover changing your mind or not liking the EA. All brokers are different, and results are never promised because markets are constantly changing.
Customer reviews
Reviews of Supply and Demand Dashboard PRO MT4 V4.2
You must be logged in to post a review.
- Excellent on Trustpilot 4.6 out of 5 from 120 reviews (opens in a new tab)
- 28,000+ traders since 2019
- 1,180+ official EAs
- Card or crypto payments
Related EAs
Traders also explore
Premium expert advisors at vault-low prices, with your crypto price on every card.
 Save 86%
 Save 95%
 MT4Save 86%
 MT4Save 68%
There are no reviews yet.